Setting up Nginx
The complete deployment is a project in itself. The good thing then is that you can put it on GitHub and share/version-control it with colleagues. We do have to watch out for Secrets and put them somewhere else though.
Create a folder/directory (although this article is written on OSX, I'll stick to 'directory') somewhere on your dev machine:
mkdir deployProject
cd deployProject
In there all the Services and the Proxyserver each have their own directory.
Docker Network
If you use only 1 docker-compose.yml file with all services in it, then networking is done for you by docker. The different services can be accessed by their service name (the service-name in docker-compose).
But, since in our setup each service gets its own docker-compose.yml file, we need to use an external Docker Network and use IP addresses to let the services talk to each other.
An external docker network is a network created outside some docker-compose file. In the compose file you 'attach' to that network. It should already be created before running the first docker-compose file.
create_network.sh
Create a 'create_network.sh' file with the following contents:
#! /bin/bash

docker network create \
  --driver=bridge \
  --subnet=172.30.0.0/16 \
  --ip-range=172.30.0.0/16 \
  --gateway=172.30.0.1 my-net
driver=bridge, Allows containers connected to the same bridge network to communicate.
subnet=127.30.0.0/16,
This defines the network itself. In this case from 127.30.0.0 to 127.30.255.255.
ip-range=172.30.0.0/16, Containers can use IP addresses within this range
gateway=172.30.0.1, The gateway to this network is this address. Meaning: Everything goes via this address.
Set the correct permissions on the 'create_network.sh' file and run it
$ chmod +x create_network.sh
$ ./create_network.sh
1f5f0af217c5642fe146a2f4f31ee26bbd267cd77206e50f79a2cc7c4d33fbd2

$ docker network ls
NETWORK ID     NAME                 DRIVER    SCOPE
05edd37872ae   bridge               bridge    local
34ec89b76309   deployment_default   bridge    local
c3d54e8a6716   host                 host      local
646c86930e37   my-net               bridge    local
98e8b6a26fcc   none                 null      local
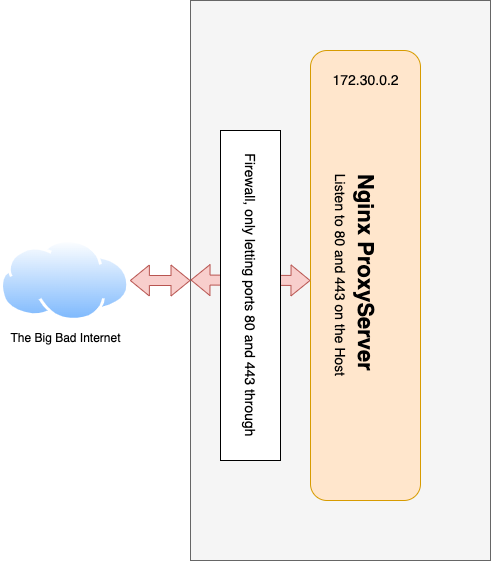
Setting up the ProxyServer (Nginx)
Let's start off easy with a bare nginx proxyserver and a very simple website.
cd deployProject
mkdir proxyserver
cd proxyserver
ProxyServer - docker-compose file
In the proxyserver directory create a file called 'docker-compose.yml'.
Below the file is in parts with explanation:
version: '3.9'

services:

  proxyserver:
    image: nginx:1.21.4
    container_name: proxyserver
    working_dir: /usr/share/nginx/html
- Docker-Service is called 'proxyserver', but is not used anywhere else.
- For the image we take one of the latest (at the time of this writing) versions of the nginx image
- Always good to specify a container_name, that looks better in your list of containers. In this case we are building the 'proxyserver'.
- The working directory is like the home when you enter the container. /usr/share/nginx/html is the default homedirectory for the standard nginx image.
Ports
In the container the Nginx is listening on port 80. The host should also listen on port 80 and pass all that traffic on to the proxyserver container. Therefore, a Ports section is needed which maps the Container "80" (the second "80" in "80:80") to the port on the Host (the first "80" in "80:80")
    ports:
      - "80:80"
This Ports section will be extended with other services like SFTP, SMTP and 443 for SSL traffic.
Make sure that on the Host itself (the Unix box you are doing this on) no Nginx is running and port 80 is not yet taken by any other service.
Network
We make use of that Docker Network we created earlier by calling the 'my-net' network for this service.
    networks:
      my-net:
        ipv4_address: 172.30.0.2
The ProxyServer is running on 172.30.0.2 which fits nicely in the network created.
Volumes
Volumes map host directories to directories inside the container. When the container is removed these directories still exist on the host.A good practice is to have all the files, which change, mapped from the host to the container. Then it is possible to make use of standard images from Docker Hub instead of making your own Images.
The Nginx environment has a number of files which are specific for your own installation:
- All files in the /etc/nginx/conf.d directory.
- The /etc/nginx/nginx.conf file
- We need a dummy website in case the request is pointing to this proxyserver (IP-address) but not to a service we specified. This dummy website is like a catch all
- A number of logfiles which will be created by Nginx
First the Volumes section, then the files themselves in a next paragraph
    volumes:
      - ./deployment/etc/nginx/conf.d:/etc/nginx/conf.d:ro
      - ./deployment/etc/nginx/nginx.conf:/etc/nginx/nginx.conf:ro
      - ./deployment/usr/share/nginx/html:/usr/share/nginx/html:ro
      - ./deployment/var/log/nginx:/var/log/nginx
The ":ro" in the configuration files means that the Container itself cannot change these. Changes need to be done on the Host.
Specify the external network
In the service 'proxyserver' we specified that this service makes use of a network called 'my-net'. We need to specify this network somewhere. Since it's an external network (as we created at the top of this article), it's specified at the bottom of the docker-compose file as a reference to the external network in a separate 'networks' section.
networks:
  my-net:
    external: true
    name: my-net
Full docker-compose.yml file
The complete file looks like this:
version: '3.9'

services:

  proxyserver:
    image: nginx:1.21.4
    container_name: proxyserver
    working_dir: /usr/share/nginx/html
    ports:
      - "80:80"
    volumes:
      - ./deployment/etc/nginx/conf.d:/etc/nginx/conf.d:ro
      - ./deployment/etc/nginx/nginx.conf:/etc/nginx/nginx.conf:ro
      - ./deployment/usr/share/nginx/html:/usr/share/nginx/html:ro
      - ./deployment/var/log/nginx:/var/log/nginx
    networks:
      my-net:
        ipv4_address: 172.30.0.2

networks:
  my-net:
    external: true
    name: my-net
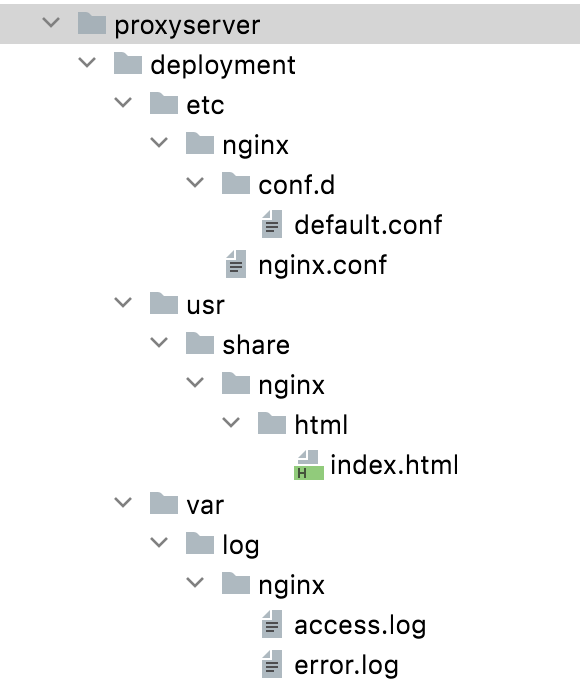
Creating the Nginx directories and files
To keep a clear view which files are mapped to the Container, a special subdirectory is created called 'deployment'. Files inside this subdirectory are all mapped to the Container. (At least that is my convention. Change it if you like)
cd deployProject/proxyserver
mkdir deployment
cd deployment
Inside the deployment subdirectory the Nginx files are created in a directory structure which looks like the one on the Container: (again: convention, not a must)
mkdir -p etc/nginx/conf
mkdir -p usr/share/nginx/html
mkdir -p var/log/nginx
nginx.conf, located in deployment/etc/nginx/conf
This is the main configuration file of Nginx, nothing special about this, taken from a standard Nginx installation. For tweaking on this file, check out the Nginx docs
This file is placed in deployment/proxyserver/etc/nginx/ and is called nginx.conf
Check out the last line where all *.conf files from the 'conf.d' directory are imported in the Nginx configuration. That's where the other Websites and Services will be defined.
user  nginx;
worker_processes  1;

error_log  /var/log/nginx/error.log warn;
pid        /var/run/nginx.pid;

events {
    worker_connections  1024;
}

http {
    include       /etc/nginx/mime.types;
    default_type  application/octet-stream;

    log_format  main  '$remote_addr - $remote_user [$time_local] "$request" '
                      '$status $body_bytes_sent "$http_referer" '
                      '"$http_user_agent" "$http_x_forwarded_for"';

    access_log  /var/log/nginx/access.log  main;

    sendfile        on;

    keepalive_timeout  65;

    include /etc/nginx/conf.d/*.conf;
}
A default.conf file for the catch-all website
A minimal default.conf is required to configure the catch-all website when no domainname is given and a request comes in on port 80.
The file is placed as default.conf in proxyserver/deployment/etc/nginx/conf.d (and mapped to /etc/nginx/conf.d/default.conf in the Docker Container)
server {
    listen 80;

    location / {
        root   /usr/share/nginx/html;
        index  index.html;
        try_files $uri $uri/ /index.html;
    }

    location ~ /\.ht {
        deny  all;
    }
}
Again, nothing fancy. Go to the Nginx Docs if more functionality is needed
Create the Catch-All Website
A simple index.html to act as a catch-all when no other service fullfills the request to the ProxyServer.
The index.html is placed in proxyserver/deployment/usr/share/nginx/html (where the Nginx default config expects it)
<!DOCTYPE html>
<html lang="en">
<head>
    <title>ProxyServer</title>
</head>
<body>
    <h3>Nothing to see here</h3>
</body>
</html>
Directory and file structure
After the commands above the folder structure will look like this:
(The logfiles will be created automatically after the ProxyServer is started and mapped back to the Host, so you can read them on the Host)